前言
最近实训根据老师的要求实现了一个Android端的http、rtsp播放器,根据地址连接并播放视频实时流,并附带人脸检测、目标检测等功能,在此重构一下实现过程并总结。
总体分析
首先,需要实现从通过http、rtsp协议发送的视频流中获得视频帧,不然接下来的工作都没法继续。能获取视频帧后就能进行人脸检测或目标检测等工作。所以,获取视频帧至关重要。关于视频帧的获取最初的想法是通过OpenCV-Android来实现,使用VideoCapture直接通过地址打开视频流,然后通过while获取每一帧,但是怎么都打不开( isOpened()总是返回false ) 但是使用JAVA却能打开,通过网上查找资料得知VideoCapture打开媒体的后端是通过ffmpeg实现的。至于Android怎么使用VideoCapture打开视频流,,emmm我还是换个方法吧。根据老师的提示接触到了vlc,但是vlc并没有在java端提供返回视频帧的回调接口,要想使用的话就要修改源码并通过jni暴露给java层使用(过程异常复杂,需要自行修改代码,然后还要自行编译源码,中间的坑数不胜数)。不过,,,在逛github时发现了这位大佬地址,最后使用了他封装好的aar解决了视频帧获取的问题。既然视频帧的问题解决了,人脸检测的话就用OpenCV实现,目标检测使用TensorFlow Lite实现,具体的实现后面再说。
视频流的播放
既然已经可以获取到帧了,那么就通过<ImageView/ >逐帧显示达到播放的效果,Android更新UI需要开一个runOnUiThread来实现
1
2
3
4
5
6
| runOnUiThread( new Runnable() {
@Override
public void run() {
video_view.setImageBitmap(bitmap);
}
});
|
显示的问题也解决了,那么怎么通过libvlc获取视频帧,下面是我画的一个大致流程图:

具体实现代码如下:
1
2
3
4
5
6
7
8
9
10
11
12
13
14
15
16
17
18
19
20
21
22
23
24
25
26
27
28
29
30
31
32
33
34
35
36
37
38
39
40
| private void Video_loading(String url){
ArrayList<String> options = new ArrayList<>();
options.add("--aout=opensles");
options.add("--audio-time-stretch");
options.add("-vvv");
mLibVLC = new LibVLC(this,options);
media = new Media(mLibVLC, Uri.parse(url));
if (mediaPlayer != null){
mediaPlayer.release();
}
mediaPlayer = new MediaPlayer(media);
ByteBuffer frameBuffer = ByteBuffer.allocateDirect(Frame_width*Frame_height*Pixel_Size);
mediaPlayer.setVideoFormat("RGBA",Frame_width,Frame_height,
Frame_width*Pixel_Size);
mediaPlayer.setVideoCallback(frameBuffer,new VideoCallback());
mediaPlayer.setMedia(media);
media.release();
mediaPlayer.play();
}
private class VideoCallback implements MediaPlayCallback{
@Override
public void onDisplay(ByteBuffer buffer) {
buffer.rewind();
bitmap = Bitmap.createBitmap(Frame_width,Frame_height, Bitmap.Config.ARGB_8888);
bitmap.copyPixelsFromBuffer(buffer);
showFrame(bitmap);
}
}
private void showFrame(final Bitmap bitmap){
runOnUiThread( new Runnable() {
@Override
public void run() {
video_view.setImageBitmap(bitmap);
}
});
}
|
放映的问题解决了,接下来就是人脸检测以及目标检测。对于这两个的实现无非是在放映之前对帧进行处理,处理完后再放映。
人脸检测
人脸检测的话使用OpenCV实现。使用OpenCV的分类器加载已经训练好的haar级联分类器逐帧检测达到实时检测的效果。至于Android端OpenCV的安装这里不多陈述。大致流程图:

初始化检测器: 我使用的是haarcascade_frontalface_alt.xml,对比了一下其他的发现这个检测速度好像比较快一点(xml文件在:目录/OpenCV-android-sdk\sdk\etc 的haarcascades文件夹和lbpcascades文件夹中):
1
2
3
4
5
6
7
8
9
10
11
12
13
14
15
16
17
18
19
|
private void initClassifier(){
try {
InputStream is = getResources().openRawResource(R.raw.haarcascade_frontalface_alt);
File cascadeDir = getDir("cascade", Context.MODE_PRIVATE);
File cascadeFile = new File(cascadeDir,"haarcascade_frontalface_alt.xml");
FileOutputStream os = new FileOutputStream(cascadeFile);
byte[] buffer = new byte[4096];
int bytesRead;
while ((bytesRead = is.read(buffer)) != -1){
os.write(buffer,0,bytesRead);
}
is.close();
os.close();
face_detection = new CascadeClassifier(cascadeFile.getAbsolutePath());
} catch (Exception e){
e.printStackTrace();
}
}
|
进行人脸检测: 使用初始化好的分类器调用detectMultiScale函数进行检测,可以传两个参数:
- Mat image: 需要检测的图像
- MatOfRect objects: 用来存储检测到人脸的位置信息
然后根据MatOfRect的信息绘制检测框:
1
2
3
4
5
6
7
8
9
10
11
12
13
14
15
16
17
18
19
|
private Bitmap onFaceDetection(Bitmap srcBitmap){
Bitmap drawBitmap;
Mat src = new Mat();
drawBitmap = Bitmap.createBitmap(srcBitmap.getWidth(),srcBitmap.getHeight(),
Bitmap.Config.RGB_565);
Utils.bitmapToMat(srcBitmap,src);
MatOfRect faceDetections = new MatOfRect();
face_detection.detectMultiScale(src,faceDetections);
Log.d(Tag,String.format("Detected %s faces", faceDetections.toArray().length));
for(Rect rect : faceDetections.toArray()){
Imgproc.rectangle(src, new Point(rect.x,rect.y),
new Point(rect.x+ rect.width,rect.y + rect.height),
new Scalar(0,0,255),
3);
}
Utils.matToBitmap(src,drawBitmap);
return drawBitmap;
}
|
在展示视频帧之前调用onFaceDetection函数进行处理后再展示,即可以达到实时人脸检测的效果。
目标检测
目标检测使用TensorFlow Lite实现。模型使用Google已经量化好的SSD模型下载。文件夹下有两个文件,分别为一个.tflite文件(量化之后的SSD模型)以及标签文件。在项目中main下新建assets文件夹并将它们放入。
在build.gradle(app)的android结构下添加以下代码并且添加TensorFlow Lite依赖:
1
2
3
4
5
6
7
8
9
10
11
12
| android{
...
aaptOptions {
noCompress "tflite"
noCompress "lite"
}
...
}
dependencies {
...
implementation 'org.tensorflow:tensorflow-lite:0.1.7-nightly'
}
|
使用TensorFlow Lite大致流程如下:

1.创建解释器
使用模型需要通过实例化Interpreter对象创建解释器(用来推理模型)。如下:
1
2
3
4
5
6
7
8
9
10
11
12
13
14
15
16
17
18
19
20
21
22
23
24
25
|
private Interpreter loadModelFile()throws IOException {
AssetFileDescriptor fileDescriptor = getAssets().openFd(modelFileName);
FileInputStream inputStream = new FileInputStream(fileDescriptor.getFileDescriptor());
FileChannel fileChannel = inputStream.getChannel();
long startOffset = fileDescriptor.getStartOffset();
long declaredLength = fileDescriptor.getDeclaredLength();
return new Interpreter(fileChannel.map(FileChannel.MapMode.READ_ONLY,
startOffset,declaredLength));
}
private Vector<String> loadModelLabels(){
private Vector<String> labels = new Vector<String>();
InputStream labelsInput = null;
labelsInput = getAssets().open(labelFileName);
BufferedReader br = null;
br = new BufferedReader(new InputStreamReader(labelsInput));
String line;
while ((line = br.readLine()) != null){
labels.add(line);
}
br.close();
return labels;
}
|
2.创建Input和Output
在创建Input和Output之前,需要了解模型输入的张量形状以及类型和输出的张量形状以及类型。可以用如下代码得知(Python):
1
2
3
4
5
6
7
8
9
10
| import tensorflow as tf
interpreter = tf.lite.Interpreter(model_path="detect.tflite")
interpreter.allocate_tensors()
print(interpreter.get_input_details()[0]['shape'])
print(interpreter.get_input_details()[0]['dtype'])
print(interpreter.get_output_details()[0]['shape'])
print(interpreter.get_output_details()[0]['dtype'])
|
在得知Input和Output的形状后,就可以创建Input和Output进行推理。
Input:即为一个视频帧(Bitmap),不过需要处理一下才能作为网络的输入:
1
2
3
4
5
6
7
8
9
10
11
12
13
14
15
16
17
18
19
20
21
22
23
24
25
26
27
28
29
30
31
32
33
34
35
36
| private ByteBuffer createInput(final Bitmap bitmap){
int numBytesPerChannel;
ByteBuffer imgData;
int inputSize = 300;
float IMAGE_MEAN = 128.0f;
float IMAGE_STD = 128.0f;
if(isQuantized)
numBytesPerChannel = 1;
else
numBytesPerChannel = 4;
imgData = ByteBuffer.allocateDirect(1 * inputSize * inputSize * 3 * numBytesPerChannel);
imgData.order(ByteOrder.nativeOrder());
int[] intValue = new int[inputSize * inputSize];
bitmap.getPixels(intValue,0,bitmap.getWidth(),
0,0,
bitmap.getWidth(),bitmap.getHeight());
imgData.rewind();
for (int i = 0; i < inputSize; ++i) {
for (int j = 0; j < inputSize; ++j) {
int pixelValue = intValue[i * inputSize + j];
if (isQuantized) {
imgData.put((byte) ((pixelValue >> 16) & 0xFF));
imgData.put((byte) ((pixelValue >> 8) & 0xFF));
imgData.put((byte) (pixelValue & 0xFF));
} else {
imgData.putFloat((((pixelValue >> 16) & 0xFF) - IMAGE_MEAN) / IMAGE_STD);
imgData.putFloat((((pixelValue >> 8) & 0xFF) - IMAGE_MEAN) / IMAGE_STD);
imgData.putFloat(((pixelValue & 0xFF) - IMAGE_MEAN) / IMAGE_STD);
}
}
}
return imgData;
}
Object[] Input = {createInput(Bitmap inputImage)}
|
Output:
1
2
3
4
5
6
7
8
9
| Map<Integer, Object> Output = new HashMap<>();
float[][][] outputLocations = new float[1][10][4];
float[][] outputClasses = new float[1][10];
float[][] outputScores = new float[1][10];
float[] numDetections = new float[1];
outputMap.put(0, outputLocations);
outputMap.put(1, outputClasses);
outputMap.put(2, outputScores);
outputMap.put(3, numDetections);
|
进行推理:
使用实例化的Interpreter对象进行推理。
1
| interpreter.runForMultipleInputsOutputs(inputArray, outputMap);
|
根据Output绘制检测框
网络输出的结果已经按照scores从大到小排列好了,首先选取scores大于0.5的检测结果,其他的丢掉。先用一张图片试一下,推理完后,先来看一下得分最高的检测信息:

怎么根据这四个信息绘制检测框,我的理解如下;
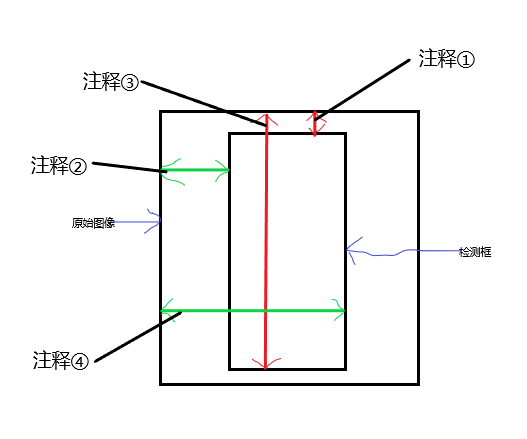
- 注释①:检测框的top到原始图像最上方的距离是原始图像height的0.084537685
- 注释②:检测框的left到原始图像最左方的距离是原始图像width的0.3836609
- 注释③:检测框的bottom到原始图像最上方的距离是原始图像height的0.9912371
- 注释④:检测框的right到原始图像最左方的距离是原始图像width的0.6238797
根据以上信息绘制一个检测框:
1
2
3
4
5
6
7
8
9
10
11
12
| RectF detection = new RectF(
outputLocations[0][0][1] * bitmap.getWidth(),
outputLocations[0][0][0] * bitmap.getHeight(),
outputLocations[0][0][3] * bitmap.getWidth(),
outputLocations[0][0][2] * bitmap.getHeight()
);
final Canvas canvas = new Canvas(bitmap);
final Paint paint = new Paint();
paint.setColor(Color.RED);
paint.setStyle(Paint.Style.STROKE);
paint.setStrokeWidth(2.0f);
canvas.drawRect(detection,paint);
|
如下:

到这里,目标检测算是完成了。
最后总结
通过不断的查找资料和阅读各位大佬的代码,终于将其融合实现了这些功能。这段时间学的东西有点多,所以开篇博客汇总一下。至于播放速率大概有30-40FPS,开启人脸检测后20-25FPS,开启目标检测30-35FPS。效果还能接受。